Terms, Contact Info, Recipe Index, and link love

5.30.2012

Vanilla Bean Meringue Cupcakes with Strawberry Rhubarb


  Rhubarb is definitely a Grandma ingredient.  Unfortunately, I've never felt too friendly with it.  I'd eat it, somewhat begrudgingly, as a kid.  When I grew up a little more and could pick and choose, I deliberately avoided it.  It was red, weird, crunchy, and sort of bitter.

  Why are people attracted to this?  That question ran through my head every time the family flocked around grandma's rhubarb meringue pie, or whatever else she had concocted with her garden's abundance.  I'd shrug my shoulders and go for the cookie jar and juice, cringing slightly at the purple reddish vegetables on everyone's plates. 


  Not only was I guilty of disliking this odd vegetable, I was also known to eat the meringue bits off of my parent's plates of pie, leaving them with their precious rhubarb.  I was a total meringue freak.  Grandma would sometimes have containers of them, darkened and with just the right amount of chew.  I could easily put those away.  This was done much to my parent's chagrin, since they had to endure the sugar-y effects for the two-hour drive back home.

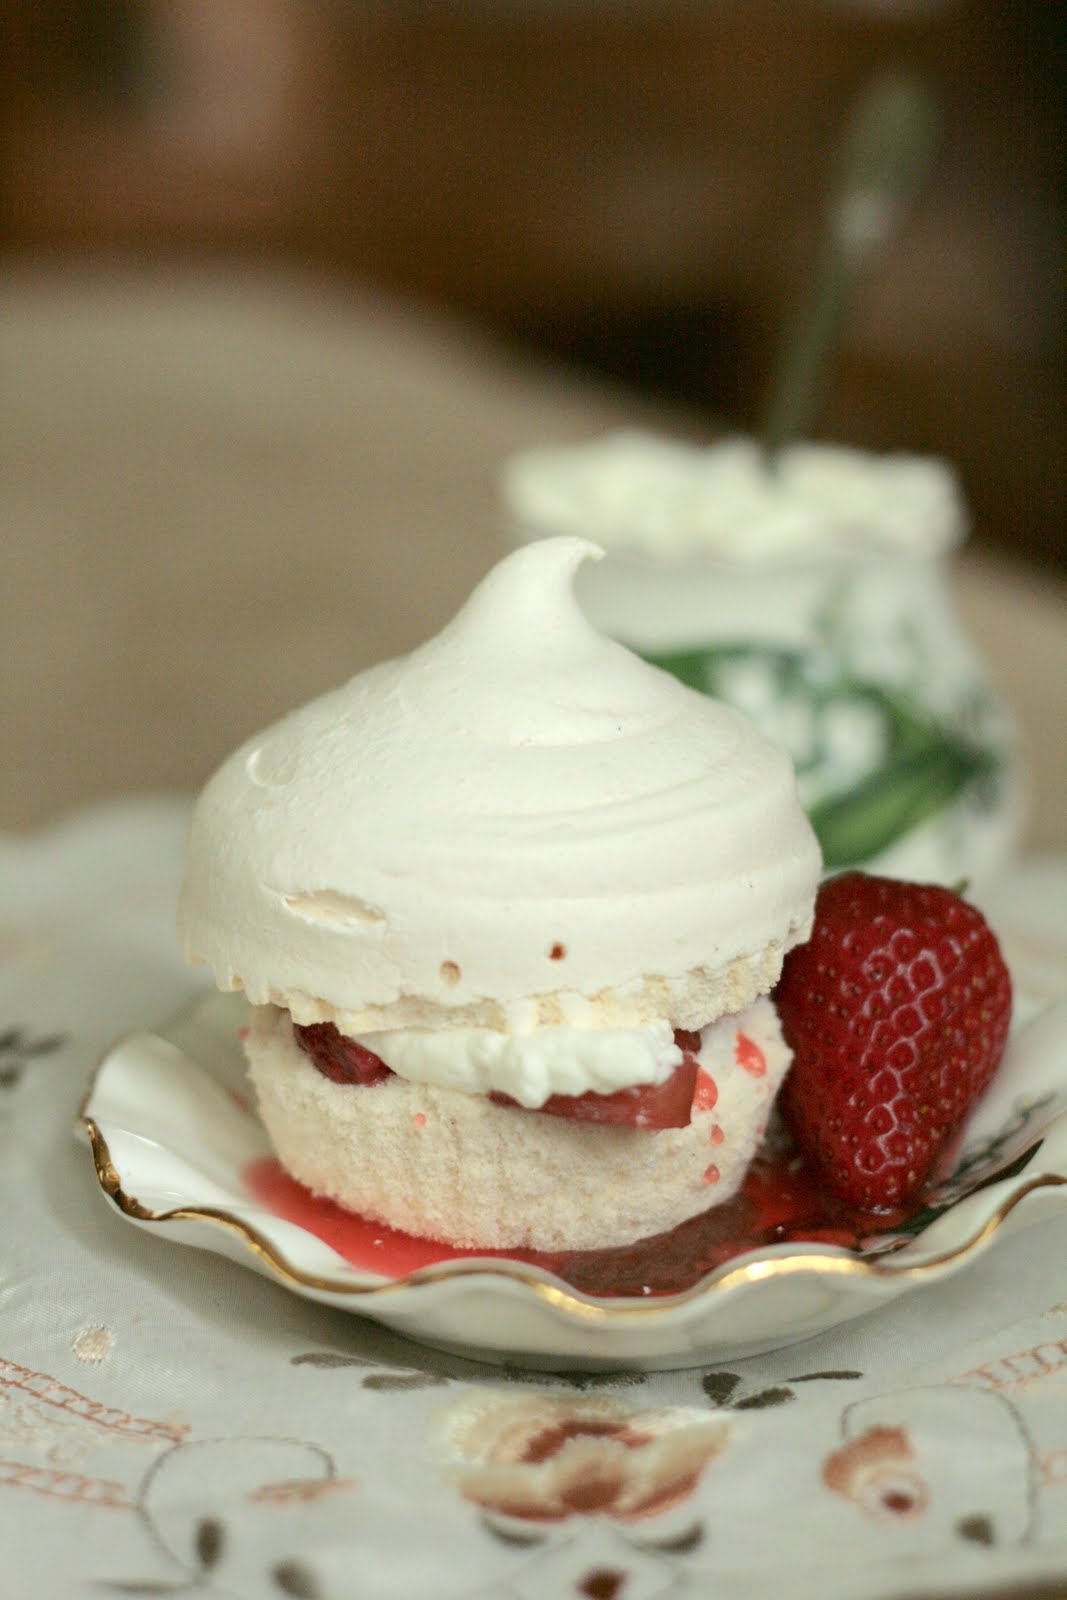
  I got a cupcake calendar this past Christmas, and this month's cupcake appeared to be some sort of fluffy cake, topped with a meringue cap that was sandwiching some sort of strawberry filling and whipped cream.  It looked heavenly.  I scanned the recipe cards that had come with it, and found out that the whole cupcake was actually meringue.  Score!  Further inspection led to something disheartening: a strawberry rhubarb compote was the filling.


  My first thought was to double the amount of strawberries to make up for the instinctual rejection of rhubarb.  But I paused.  My neighbor's patch of rhubarb was huge, the stuff grows like weeds; and the bigger it gets, the more bitter it tastes.  Timing is essential with rhubarb picking, surely they wouldn't mind me taking a couple of stalks.  I decided it was time to tackle my rhubarb fears, as long as I had the meringue to compensate.

  I mixed up the compote, simmering down the rhubarb in sugar, and combining the resultant juice with the liquid leavings of the simmered strawberries.  This combined juice was boiled down into a syrup, then tossed with the softened chunks of rhubarb and strawberry.  I couldn't help feeling like I was ruining a perfectly good 10 oz. of strawberries with this torture.  I baked the meringue, let it cool overnight, and peeled off the liners.  I cut off the top, reluctantly spooned on the compote, and dolloped on some whipped cream for good measure.

  I took my first bite, and the rest was consumed in seconds.

  Hello rhubarb.


Vanilla Bean Meringue Cupcakes with Strawberry Rhubarb
Yield: 12 cupcakes

Ingredients for the strawberry rhubarb compote:
Makes about 2 cups
  • 10 ounces (about 2 cups) fresh strawberries, hulled and chopped
  • 1/4 cup plus 1/3 cup sugar, divided
  • 1 tablespoon fresh lemon juice
  • 10 ounces (about 2 3/4 cups, or 2 large stalks) trimmed fresh rhubarb, cut into 1/4-inch pieces 
  • 2 tablespoons water 

Ingredients for the cupcakes:
  • 6 large egg whites, at room temperature
  • 1 teaspoon white vinegar
  • 1/2 of a vanilla bean, scraped
  • 1/2 teaspoon salt
  • 1 3/4 cups sugar
  • 1/2 cup heavy cream
  • powdered sugar in tablespoonfuls, for sweetening the cream as desired

Directions:
To make the strawberry rhubarb compote, stir strawberries, 1/4 cup sugar, and lemon juice in a small nonreactive pan; bring to a simmer over medium heat.  Cook, stirring often, until softened; about 3 minutes. Remove strawberries from the pan with a slotted spoon, leaving the juice, and place in a medium bowl to cool. Set aside the pan with strawberry liquid.

Meanwhile, in another small pan over medium-low heat, combine rhubarb, remaining 1/3 cup sugar, and the water. Simmer gently, stirring often, until sugar is dissolved and rhubarb is almost tender; about 6 minutes. Using a slotted spoon, transfer rhubarb to the bowl with the strawberries. Add the strawberry liquid to the pan with the rhubarb liquid.  Raise the heat to medium and simmer, stirring occasionally, until thickened and reduced to about 1/2 cup; about 10 minutes. Let cool before stirring into the strawberry-rhubarb mixture.  Store in an airtight container in the fridge until ready to use.

To make the cupcakes, preheat the oven to 225 degrees F.  Line every other cup of two standard muffin tins with paper liners; coat each with cooking spray.  Fit a large piping bag with a large plain tip.

With a stand mixer fitted with the whisk attachment, whisk egg whites, vinegar, vanilla bean seeds, and salt on medium-high speed until frothy. Add sugar 1 tablespoon at a time, beating for 1 minute after each addition; occasionally stop before an addition and scrape the bowl down, to ensure all the sugar is getting dissolved. Continue whisking until firm, glossy peaks form, and you've mixed in all the sugar.

Transfer meringue to prepared pastry bag and pipe into lined, greased cups so meringue is about 2 inches above rims, finishing with a peak in the center.  Bake, rotating halfway through, for 3 to 3 hours and 20 minutes. (Cupcakes should be completely dry on the outside but still soft in the middle, a toothpick inserted horizontally at the base of the top should have moist but cooked crumbs attached.)  Remove from oven and immediately remove from tins.  Transfer cupcakes to wire racks; let cool completely before peeling off the liners.

Just before serving, whisk (you can also use an electric mixer) together the heavy cream and desired amount of powdered sugar (I used about 2 tablespoons) until soft peaks form.  Using a serrated knife, gently slice tops off cupcakes (don't worry if they crack, they'll still taste good).  Spoon compote and then whipped cream onto bottom halves, and replace tops.  Serve immediately.


Sources: cupcake adapted from Martha Stewart and Whisk Kid, compote via Martha Stewart

5.27.2012

Vegan Chocolate Cupcakes with Peanut Butter Nutella Buttercream


  Sooo, this cupcake is totally vegan.  The buttercream is...kinda sorta vegan.  Peanut butter, no big deal.  Nutella?  Apparently it contains milk product.  But wait wait wait!  If you're a vegan and you're wringing your hands, stop.  You can make your own!  Vegan-ize it!  There's lots of stuff out there, but this recipe looks pretty good.  Everybody wins!


  Now you might be thinking, how on earth do you make cake without eggs or butter?  Avocado, and vegetable oil!  Ferreals!  Maybe this isn't new information to all, but it is for me.  At least the avocado part is.  When I saw this week's Sundays with Joy recipe, I was like, "Say whaaat?"

  But I was a good sport, and gave it a go.  And you know what?  They were actually pretty darn good!  No slightly perceptible green chunks, and a very handsome texture.


  Aaand the buttercream?  Well, it was just a vegan chocolate buttercream.  To be honest, I was bored, and kinda tired of plain ol' chocolate buttercream.  Vegan or no.  So I thought I'd do vanilla.

  But then I was like...don't I have peanut butter?  Oh yeah, that could work.  I went to the pantry, and a jar of Nutella got all up in my face.  I decided a bit of chocolate couldn't hurt, as long as there was peanut butter around.


  You see where this is going.  A little of this, a little of that...and I had this gorgeous, fluffy, and not-so-vegan frosting.  Newsflash, I'm not vegan.  And I don't know if I could ever be.  But, if I ever were to become so, these would be my go-to cupcakes.

  As I did last week,  I will not be sharing the cupcake recipe, since it is not my own, but Joy's.  If you want to get your hands on it, I highly recommend purchasing her book!  But I will happily provide you with the buttercream recipe, since it's mostly just something I made up.  Happy Sunday!


Peanut Butter Nutella Buttercream
Yield: enough to generously frost about 20 cupcakes

Ingredients:
  • 2 sticks plus 2 tbsp. unsalted butter (or any vegan butter in sticks), at room temperature
  • 3 cups powdered sugar
  • 1 teaspoon vanilla extract
  • a pinch of salt
  • 1/4 cup peanut butter
  • 1/4 cup Nutella (you can vegan-ize it by making your own, but the texture may not be as smooth)
  • 1-2 tablespoons milk (or soy milk), or as needed

Directions:
In the bowl of an electric mixer fitted with the paddle attachment, beat the butter on medium speed until soft and fluffy.  Scrape down the bowl and add the powdered sugar.  Mix on low speed to first incorporate, then increase speed and beat until well-combined.  Beat in the vanilla and salt.  Add the peanut butter and nutella, and mix until combined.  Add the milk, and then increase the speed to medium-high and beat until soft and fluffy.

**Note: If you aren't planning to pipe frosting on the cupcakes, you will want to decrease the amounts here by 50%, since just spreading uses much less frosting.


Sources: inspired by Joy the Baker's Cookbook

5.26.2012

Brown Butter Dutch Baby Pancake with Lemon and Sugar


  Well.  I've kinda been having one of those flop-like baking weeks.  If you ask me, anyway.  Ask anyone else that lives here and they'll tell you that's ridiculous, one broken bundt definitely doesn't define my week.  But to them, they only care about what stuff tastes like.  That is super important, but I'm a sucker for pretty presentation.  When things break or fruit gets mushy, I'm not happy.  I can't take pretty pictures and, subsequently, can't blog about the recipe.


  I want the stuff I post here to be almost foolproof, and easy to understand.  If I can't get a bundt to come out right, then it goes to my "to fuss with later" pile.  The bundt itself tasted amazing, but it could be better.  I don't go for second best.

  What else happened?  Well, I got peaches out of season, first strike.  They were for a pandowdy (waaay too much fun to say with a Southern accent), a lovely pandowdy consisting of blackberries and gingered peaches.  My peaches were tiny, and mushy.  After mercilessly gutting them, I knew they had to be used right away.  I got my filling together, my crust was chilling out in the fridge, and the oven was ready.  Then the power went out.


  I started the pandowdy preparations at about 1:00 that afternoon, and it didn't get into a hot oven until 6:00.  I passed those hours wringing my hands, trying to read, yelling at anyone who let the cold escape from the fridge, and eating brie.

  Needless to say, I'll hold off on the pandowdy-ing until peaches are more in season.  And I am so fricken thankful for functioning electricity, and am definitely thinking that investing in a gas oven for emergencies only wouldn't be a bad idea.

  But, I did successfully candy ginger, made killer enchiladas, and lovely cupcakes (recipe tomorrow!).  But that bundt really got to me, I hate hate hate it when things don't come out of a pan right.  So I decided to a pull a Dutch Baby, I needed to blog about something.  I had to write out my frustration.  And I wanted a breakfast that wasn't pieces of chocolate bundt.  Enter this friendly, foolproof pancake.

  But that bundt hasn't had the last say.  We will meet again.


Brown Butter Dutch Baby Pancake with Lemon and Sugar
Yield: one 8 or 9-inch pancake, enough to fill up one belly.  Recipe can be doubled using the same pan, or two 6-inch skillets, to serve two.

Ingredients:
  • 2 tablespoons unsalted butter (if doubling the recipe, don't double this amount, it will still grease the pan just fine)
  • 2 large eggs
  • 1/4 cup flour
  • 1/4 cup half-and-half
  • a pinch of salt
  • Freshly squeezed lemon juice
  • Powdered sugar, sifted

Directions:
Preheat the oven to 425 degrees F.

Put the butter in an 8 or 9-inch cast-iron skillet (you can also use a similarly-sized cake pan or pie plate), and place in the preheated oven.  Let the butter cook and sizzle, swirling occasionally, until the butter is melted and there are brown solids.  Remove from the oven and tilt around, completely covering the sides and bottom with brown butter.

Meanwhile, in a blender, or with a bowl and whisk, mix together the eggs, flour, half-and-half, and salt until well-blended.  Pour into the warm skillet, and slide into the oven.  Bake for 18-25 minutes, or until the center looks set and the edges have risen and are golden brown.  It will rise and puff around the pan while in the oven, but will deflate as it cools.

Remove from the oven.  Drizzle with lemon juice and generously sprinkle with powdered sugar.  Serve immediately.


Sources: adapted from Orangette's book, A Homemade Life (Incidentally, this is one of my favorite books ever.  I heart Molly Wizenberg.)

5.22.2012

Strawberry Brown Butter Upside-Down Cake


  Woah!  Hey there summer, didn't see you sneaking up there.

  Except I totally did.  And I'm totally ready, with a totally awesome cake, that was made for summer mornings and coffee.

  If you're like me, and you don't like coffee...Earl Grey is always the answer.


  I'm going to get down to business here, let me tell you what's what.

  First of all, the only thing that should intimidate you about an upside-down cake is the fact that you will likely eat half of it.  The rest, no biggie.  Easy as...cake.  Upside-down cake.  'Kay whatever.

  Second, upside-down cake can be eaten warm!  No waiting hours for the cake to freaking cool so you can turn it out of the pan.  A quick ten minutes of resting, and the cake is in your belly.  It slides out so beautifully!

  If you're unsure about this whole business, I'm going to walk you through it.  Eyes on the screen, people!


  Friends, we're browning butter.  In the oven, in a cake pan.  Then we're swirling that butter alll over the bottom and sides.  Essentially...we just greased a cake pan with brown butter.  If this isn't the best idea ever...I just dunno.  It soaks into the cake, and creates a gorgeous crust.  Trust!


  While we let that hot cake pan simmer down, we're going to chop our strawberries and mix up our super thick and creamy batter.  Seriously..brown sugar, butter, and sour cream.  Can it get any better?


  Then we layer the brown on the brown.  Brown sugar sprinkled on the brown butter, it's brown heaven.


  Let's add some red to this brown madness...


  ...and then top it off with some more brown.


  Bake it pretty, and let it cool in the pan for ten minutes.


  Run a butter knife around the sides, take a deep breath, and invert onto a pretty cake plate.  Woot!  You're golden!


  Grab yo self some strawberries and whipped cream, you're about to infuse your mouth with a crazy cardamom-strawberry-warm-brown delight.

  Happy (practically) summer.


Strawberry Brown Butter Upside-Down Cake
Yield: one 9-inch or 8-inch cake
Note: You can use either an 8-inch round pan with 3-inch tall sides, or a 9-inch round pan with 2-inch tall sides (I used the latter).

Ingredients for the topping:
  • 2 1/2 tablespoons unsalted butter
  • 1/4 cup brown sugar
  • 1 heaping cup sliced strawberries

Ingredients for the cake:
  • 1/2 cup (1 stick) unsalted butter, softened
  • 2/3 cup brown sugar
  • 1 large egg
  • 1 teaspoon pure vanilla extract
  • 1 1/3 cups flour
  • 1 teaspoon baking powder
  • 1/4 teaspoon baking soda
  • 1/4 teaspoon salt
  • 1/4 teaspoon ground cardamom
  • 2/3 cup sour cream

Directions:
Preheat oven to 350 degrees F.

Place the 2 1/2 tbsp. butter in the cake pan and place in the oven.  Keeping a constant eye out, allow the butter to melt and then sizzle.  This is the water cooking out of the butter.  Cook just until the butter is golden and the solids on the bottom are browned, the butter will have a nutty aroma.  Be sure to open up the oven and swirl around the cooking butter once in awhile.  Immediately remove and, using two pot holders, tilt the pan around, coating the sides of the pan with brown butter.  Once sides are coated, set aside the pan to cool down.

In a medium bowl, whisk together flour, baking powder, baking soda, salt, and cardamom.  Set aside.  In the bowl of an electric stand mixer, fitted with a paddle attachment, cream the 1/2 cup softened butter and  2/3 cup brown sugar on medium speed.  Cream until slightly pale and fluffy, about 3 minutes.  Stop mixer, scrape down the bowl, and add egg and vanilla extract.  Beat for 1 minute.

Turn the mixer off, scrape down the bowl, and add the dry ingredients.  Beat on low speed while adding the sour cream, until the batter just starts to come together but is not completely combined, it will be thick.  Remove the bowl from the mixer and finish incorporating the ingredients with a spatula.

Sprinkle 1/4 cup brown sugar into the brown butter in the cake pan.  Spread the strawberry slices over the butter and sugar in a single layer.  Spoon batter over the strawberries and spread evenly with a spatula.  Bake for about 35 minutes, or until a skewer inserted in the center comes out clean.

Let cake rest for 10 minutes in the pan.  When it's rested, run a knife around the edge of the cake and invert the cake onto a cake plate.  Serve warm with fresh strawberries and sweetened sour cream or whipped cream.


Sources: adapted from Joy the Baker

5.20.2012

Avocado Fries with Spicy Dipping Sauce and BBQ Sour Cream Chive Dip


  My titles have been on the long side lately.  And that's cool!  Means lots of flavors are happening.

  This week's Sundays with Joy post was a challenge for me in a few ways:

  1. Deep frying...and avocados.  I was skeptical, I'll admit it.  And maybe wouldn't have tried it out if it weren't for this group.  Gettin' outside my box!

  2. I cook and stuff, a girl can't live on cupcakes and cookies alone, but my blog is definitely heavier on the baked goods.  I don't have a lot of practice taking pictures of fried things.

  3. The smell of hot oil makes my mother nauseous.  Making these entails dragging our mechanical deep fryer out to the mudroom and guessing at the oil temp, which is maintained with a blinking light and my gut instinct.


  But...I did it!  Done did.  I was surprised at how the avocados behaved here, I thought they might fall apart and get super mushy.  And hey, they might've, just make sure your avocados are medium ripe!  You want just a bit of give when you press on them, definitely no squish happening here.  But anyway, they behaved more like potatoes do when you deep fry them.  Crunchy on the outside, soft on the inside!


  How did they taste?  Pretty lovely, actually!  I was pleasantly surprised.  Avocados by themselves have a very sort of...green taste to them.  But, with deep frying, a hefty amount of salt, and some lovely dips, you're golden!  I could only eat so many of these though, they do fill you up.  These should definitely be on every restaurant menu!  They make for a fun appetizer.

  Just an FYI, unlike most of the stuff I post here, I will not be posting the avocado fries recipe.  Why?  Well, one of the reasons we're doing the Sundays with Joy group is to promote the use-age and buy-age of Joy's book, which is available on Amazon and other sources for a very decent price.  Check it out!


  So, why have I been posting the other recipes in my previous Sundays with Joy posts?  Well, in those, I changed three or more ingredients, and just put my own twist on things.  Here, the only thing I did was add some dipping sauces.  And those recipes I can share!  I highly encourage you to get your hands on Joy's book and get the recipe from there.  And hey, then you've got 99 other recipes to try out too!  Sweet deal.


Spicy Dipping Sauce
Yield: about 1 cup

Ingredients:
  • 1/4 cup mayonnaise
  • 1/4 cup sour cream
  • 2 teaspoons chili sauce, or ketchup
  • 2 tablespoons prepared horseradish, optional
  • 1/4 teaspoon paprika
  • 1/4 teaspoon salt
  • 1/8 teaspoon garlic powder
  • 1/8 teaspoon dried oregano
  • dash ground pepper
  • dash cayenne pepper, or hot sauce

Directions:
Combine all ingredients in a small bowl and whisk to combine.  Serve immediately, or chill until ready for use.


Barbecue Sour Cream Chive Dip
Yield: about 1 cup

Ingredients:
  • 1/2 cup sour cream
  • 3 tablespoons buttermilk
  • 2 tablespoons barbecue sauce
  • 1 teaspoon hot sauce
  • two pinches salt
  • 3 tablespoons fresh chives, sliced tiny

Directions:
Whisk together the sour cream, buttermilk, barbecue sauce, hot sauce, and salt.  Add in a heaping tablespoon of chives, and save the rest for garnishing just before serving.  Keep cold. 


Sources: Spicy Dipping Sauce adapted from It's Yummilicious, BBQ Sour Cream Chive Dip adapted from Joy the Baker, Avocado Fries from Joy the Baker's Cookbook
 

5.18.2012

Grandma's Egg Pancakes


  I'm pleased to announce that my first ever guest post is up!  My friend Jeremy and I have been planning this for awhile, and I finally got it written and sent off this past week.

  Head on over to Jeremy's to get the recipe and story that I shared!  Trust me, this recipe is a keeper.  A sort of sponge-y and light crepe, super easy!  I've done my best to adapt my Grandma's sparse directions so that anyone can do it.

  I hope you try them out soon, and share them with your family :) Happy weekend!

  Click here to get to the recipe and original post.


5.17.2012

Rocky Road Brownies


  On Monday, I left you with a cheesecake.  I wished mother's a belated Happy Mother's Day.  And all of a sudden, it's been three days since I've posted.  Huh.  Well here I be!  I haven't neglected you.  I've been tweeting, facebook-ing, taking pictures, and of course, baking like a madwoman.  There's a whole lot more that goes into blogging than meets the eye.


  Aaanddd I'm now co-administrator of the Sundays with Joy group.  Heck yes!  This calls for celebration, of the brownie variety.  Maybe of Joy the Baker's Rocky Road Brownie variety.

  Let me talk to you about these brownies, because I just gotta.


  Like any good Joy recipe, we're starting off with butter.  A stick and half, chopped up, and covered with cocoa powder.  Don't be scared of the coffee, it only enhances the chocolate flavor.  No icky coffee-ness, if that's not your thing.  Pinky swear!


  We're making pretty designs when we add the somewhat lumpy melted chocolate to the sugar/egg mixture.  Beauty!


  In come the dry ingredients.  The flour here keeps reminding me of ice cream.


  This batter is from thickety thickville, some squidging (absolutely a real word) via rubber spatula is required.


  Once you've squoodged your batter into submission, pile on the chocolate!  Because, you know, brownies aren't chocolate-y enough anyway.


  We're going for fudge-y here, so bake until just a few crumbs come off of an inserted toothpick.


  While your fudge-y brownies are still super hot and fresh from the oven, get your broiler roaring and pile on the marshmallows!  Ohhh yes.  This is absolutely the best part.

P.S. If you're a fancypants kitchen torch owner, that is an acceptable alternative method.


  Now, when that broiler is hot, it's...hot.  We've all had the burning marshmallow on the end of a stick, don't recreate that effect in the oven.  Mkay?  These will brown in seconds, be good to your mallows.


  Now, these brownies have been through a lot.  So don't go at them with a knife right away, let them rest and cool down a bit!  I know it's hard, but let's be considerate.

 
  As for cutting these, you'll need hot running water and a clean, damp cloth.  There's no neat way to do this, there just isn't.  And that's the beauty of it!  There's no beauty in a "neat" s'more, right?  You want it ooey, gooey, and all over your face.  That's how it is, folks.

  Get all up in this gooey marshmallow business.


Rocky Road Brownies
Yield: one 9x13" pan

Ingredients:
  • 3/4 cup (1 1/2 sticks, 12 tbsp.) unsalted butter, cut into pieces
  • 3/4 cup cocoa powder
  • 2 tablespoons strong coffee, to enhance the chocolate flavor
  • 2 large eggs
  • 1 2/3 cup granulated sugar
  • 2 teaspoons vanilla extract
  • 1 1/3 cup flour
  • 1/2 teaspoon baking powder
  • 1/4 teaspoon salt
  • 3/4 cup chopped walnuts
  • 1/2 cup chocolate chips (optional, but highly recommended)
  • 2 cups miniature marshmallows

Directions:
Preheat oven to 350 degrees F.  Grease and flour a 9x13 inch baking pan.  

Place the butter in a heatproof bowl and sift the cocoa powder over the top.  Place over a pot of simmering water, and make sure that the simmering water does not touch the bottom of the bowl.  Keep it at a gentle simmer only, no boiling!  Add the coffee and stir occasionally to help melt the ingredients.  The melted mixture will be lumpy, take a whisk to it and get out what lumps you can, the rest will eventually dissolve on their own.

In a medium sized bowl whisk together the eggs and the sugar.  Add the vanilla extract.  When the butter and chocolate have melted and come together, slowly stir the chocolate mixture into the sugar mixture.  Add the flour, baking powder and salt.  Stir to combine, batter will be thick.  Fold in the nuts.  Pour the batter in the pan, and spread into an even layer.  Sprinkle with chocolate chips, if using.

Bake for 18-25 minutes, or until a toothpick inserted into the center comes out with just a few crumbs.  Remove from the oven and set the oven to broiler.  Sprinkle the top of the hot brownies with miniature marshmallows.  Once the broiler is hot, place the brownies on an upper shelf close to the broiler heat.  Keep the oven open and do not look away.  The marshmallows will brown within 1 to 2 minutes.  Remove from the oven. (Alternativley, this can be done with a kitchen torch.) Let cool to room temperature before cutting.  

Use hot running water and a clean cloth to clean the knife blade after each slice into the cooled brownie.  This should help the marshmallow to not stick to the knife blade.  Enjoy!


Sources: adapted from Joy the Baker, who adapted it from Toll House