Terms, Contact Info, Recipe Index, and link love

10.22.2012

Peanut Butter Chocolate Chip Cake


  I have a father, and I call him papa.

  My papa had a birthday recently, and I made sure that the Sundays with Joy schedule had this cake going the weekend of it.


  My grandma had a peanut butter birthday cake recipe that was always made for my papa.  When she wasn't around to make it anymore, my mom took up the chore.

  This year, as I flipped through Joy's book, my eyes fell upon a page containing the most mouth-watering image of a piece of cake.  Peanut butter cake.


  It's pretty big when you suggest as big a change as switching up your grandma's peanut butter cake recipe.  It also says a lot when your somewhat unchanging father acquiesces.

  And so it was planned, I would use Joy's recipe in place of grandma's.


  Then October came, and with it one of the busiest weekends of work in my entire three years of seasonal employment.  But, after 8 hours of fudge making, I came home and diligently whipped up a cake and frosting.  The next morning I had it frosted and photographed within the two hours I had before going out the door.  And you can be sure that from then on until Monday, I was barely home long enough to sleep. 


  But while I was heating apple cider, spinning caramel apples, and barely keeping up with doughnut orders, my mind was on this cake- and my family's reactions to it.

  Later that night, I learned that the cake was more than acceptable.

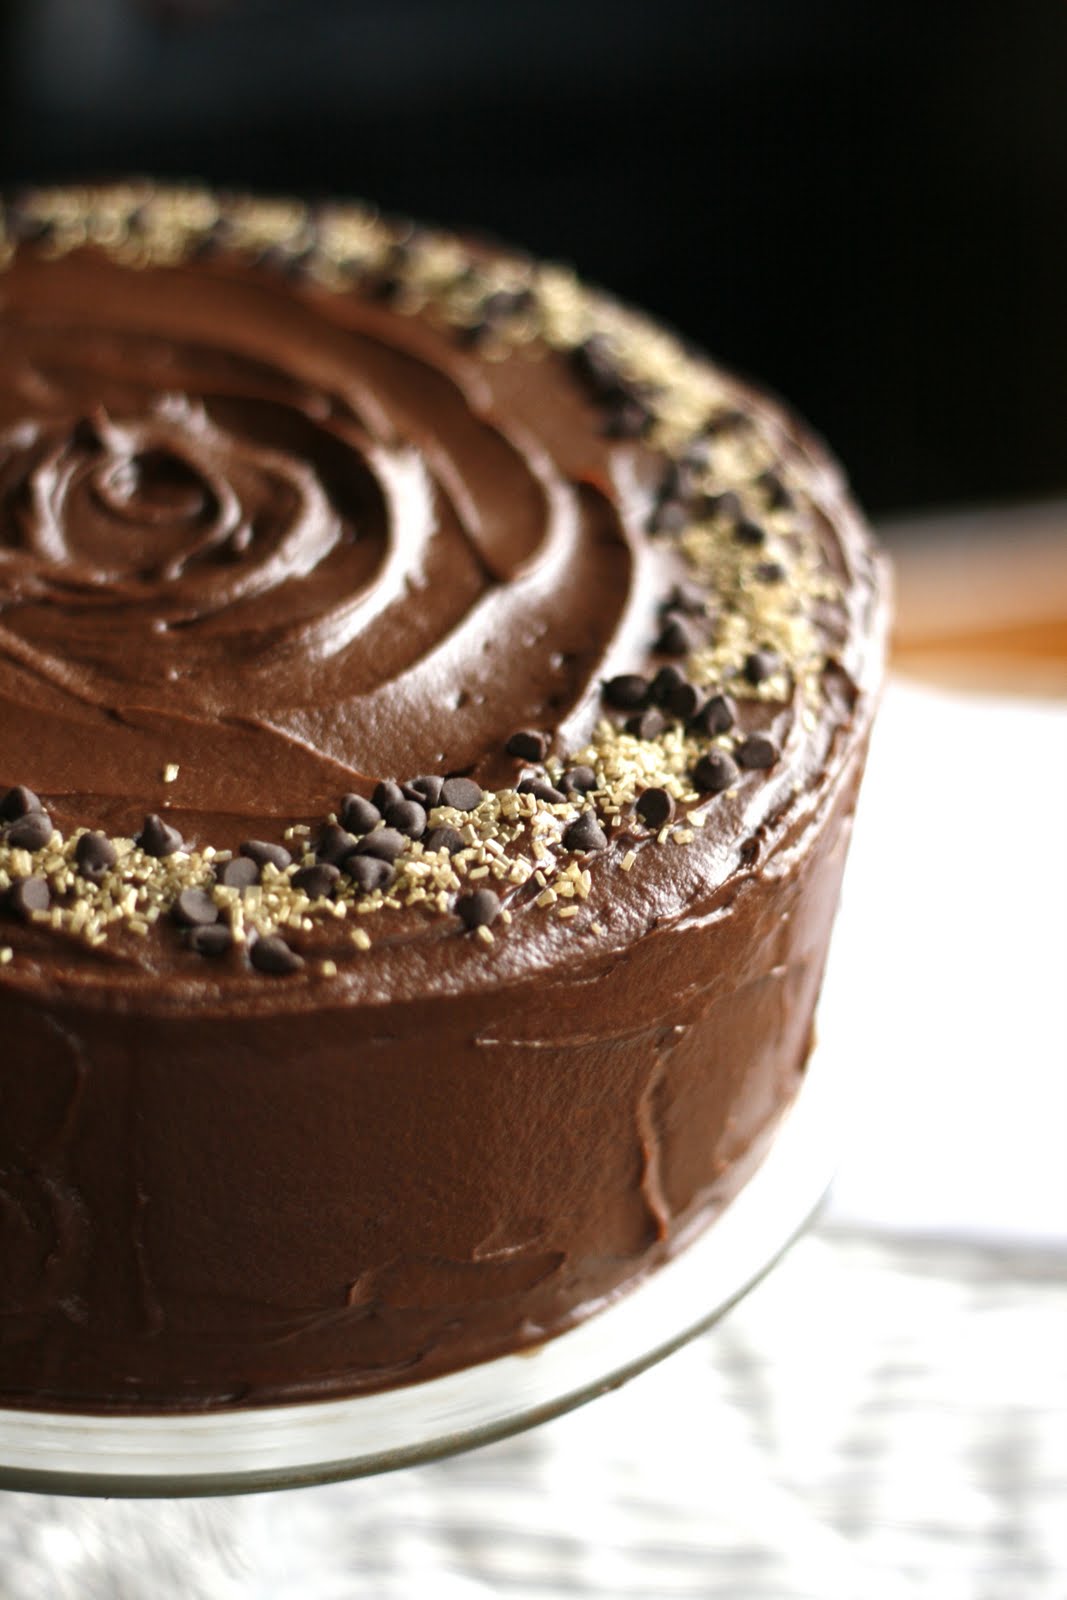
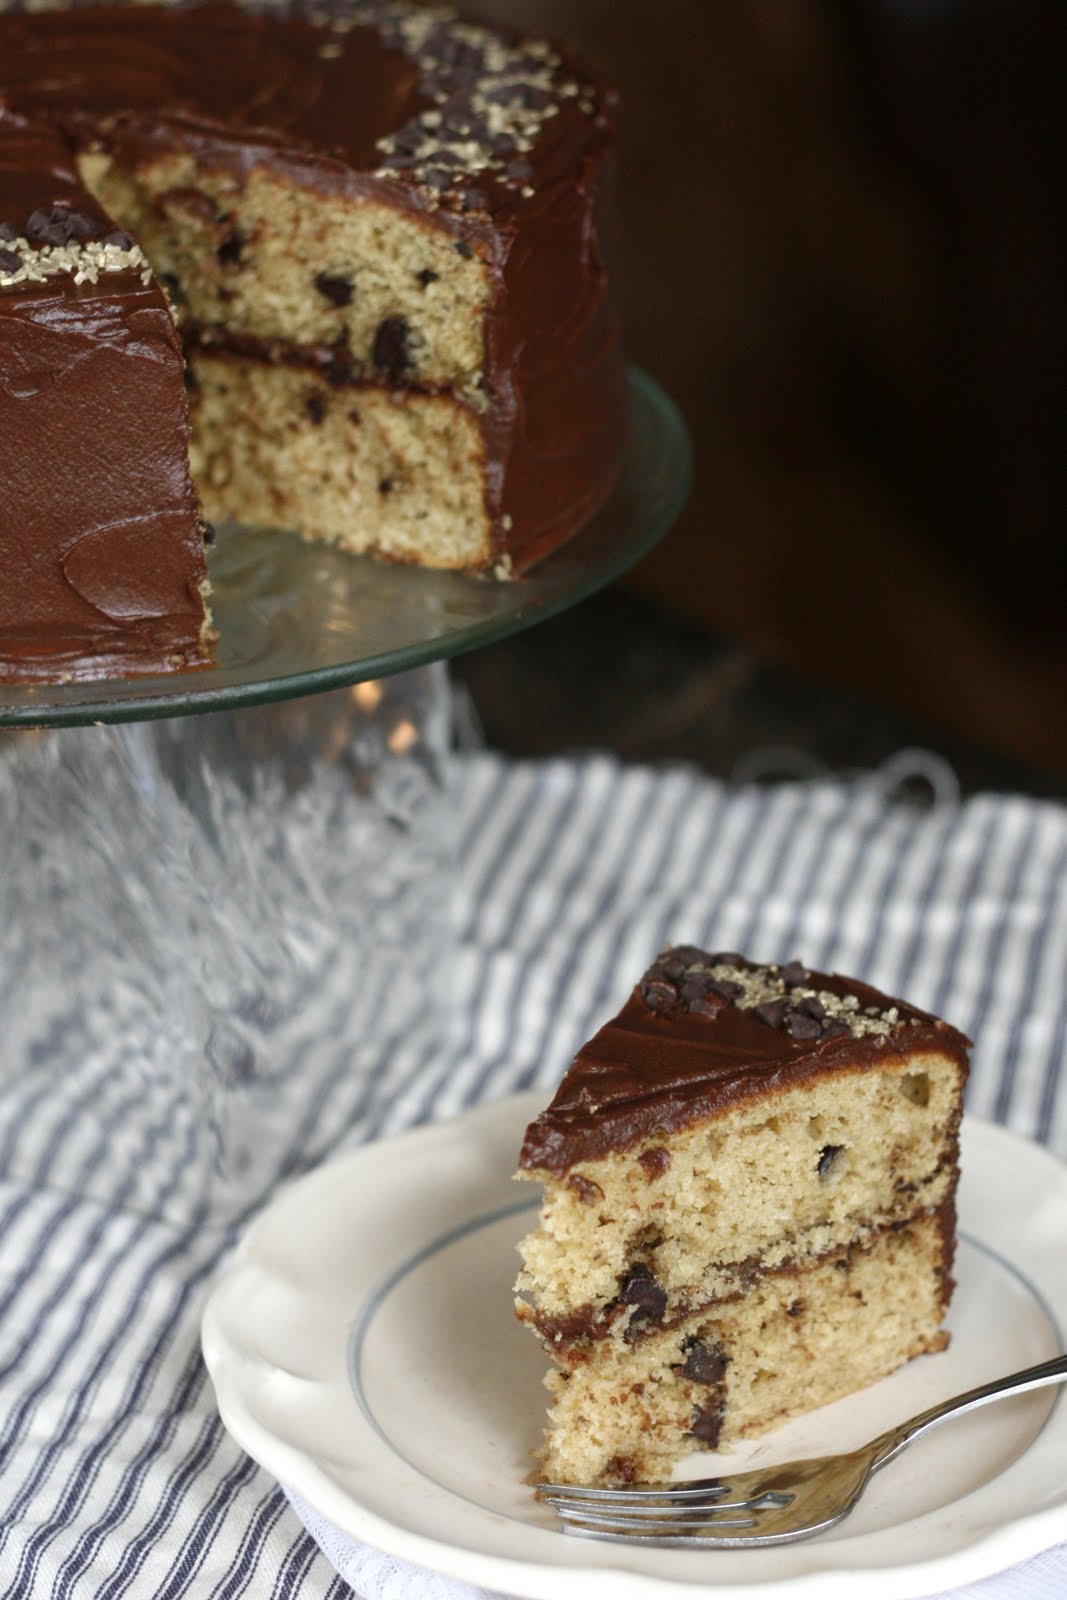
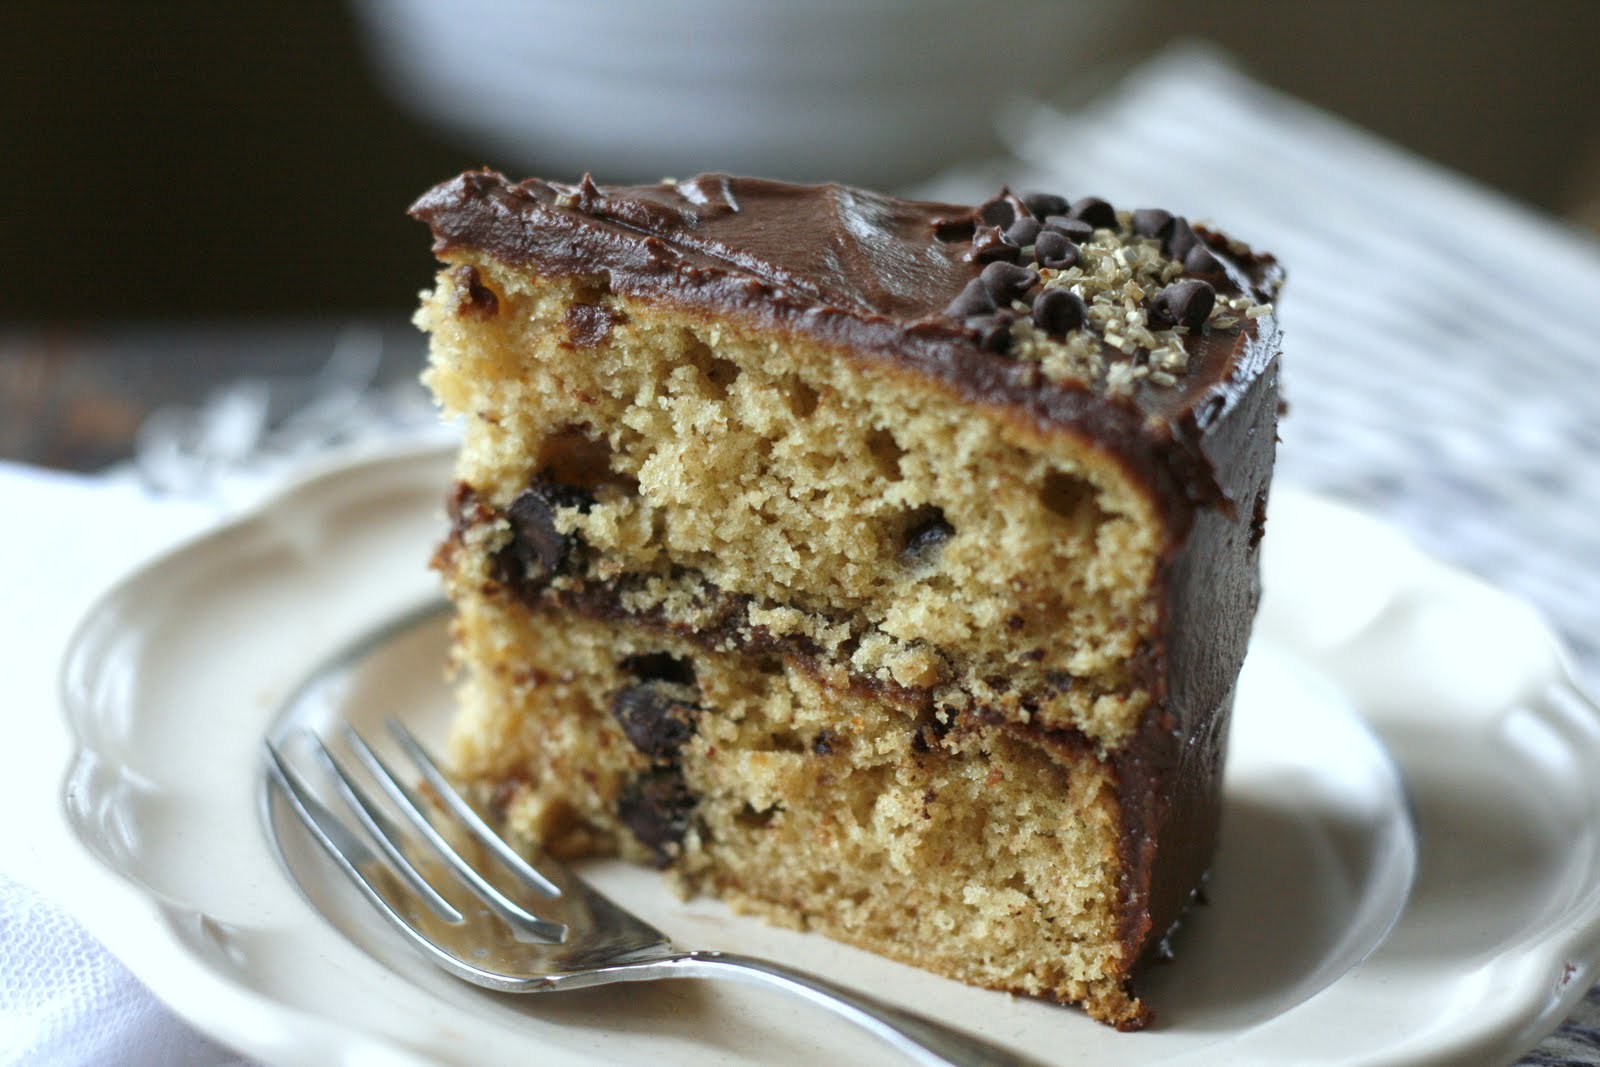
  Because I seem unable to follow recipes anymore, I sort of improvised throughout the making and combined my grandma's and Joy's recipes.  The result was popular, and garnished with Joy's secret chocolate frosting (which I actually did follow to a T), it was to die for.  Since I made no adaptations to that recipe, you'll have to buy Joy's book to get it! Or, you can also find the recipe on her blog, just click here.

  Or, in lieu of that, might I suggest this Nutella Cloud recipe?  Or perhaps this equally naughty peanut butter one?  Whatever you prefer!

  Many thanks to my lovely papa for letting me slice and photograph this baby a day ahead of his actual birthday.  He's tremendously supportive of my blogging efforts (and everything else), and I love him to pieces for it.  Happy birthday, Papa!  Thank you for trusting me with your cake this year, it meant the world to me when you said that I would've done grandma proud.


Peanut Butter Chocolate Chip Cake
Yield: makes one 8 or 9-inch 2-layer cake

Ingredients:
  • 2 1/4 cups flour
  • 2 teaspoons baking powder
  • 1 teaspoon baking soda
  • 1/2 teaspoon salt
  • 3/4 cup chunky peanut butter
  • 6 tablespoons (3/4 stick) unsalted butter, softened
  • 1/2 cup granulated sugar
  • 1/2 cup brown sugar, packed
  • 3 large eggs, at room temperature
  • 1 teaspoon vanilla extract
  • 1 cup plus 2 tablespoons buttermilk
  •  1 cup semi-sweet chocolate chips

Directions:
Position oven racks in the center and upper third of the oven.  Preheat oven to 350 degrees F.  Grease and flour two 8 or 9-inch round cake pans.  Line the bottoms with parchment and grease and flour that as well. (I just used nonstick cooking spray for the whole thing.)

In a medium bowl, whisk together the flour, baking powder, baking soda, and salt.  Set aside.  In the bowl of an electric mixer fitted with the paddle attachment, cream together the peanut butter, butter, granulated sugar, and brown sugar until fluffy; 3-5 minutes.  Add eggs, one at a time, beating on medium speed for one minute between additions.  Stop and scrape down the bowl as necessary.  Beat in the vanilla extract.

With the mixer on low speed, add half of the flour mixture until just incorporated, then slowly pour in all of the buttermilk.  When the mixture just starts to come together, add the remaining flour mixture and beat on low until the mixture has almost come together.  Remove the bowl from the mixer and add the chocolate chips.  Finish incorporating the mixture with a rubber spatula.

Divide the batter evenly between the 2 prepared pans.  Place on the 2 separate racks in the oven.  Bake for 15 minutes, rotate the cake pans to alternating racks, and continue to bake for 15-25 minutes, or until a cake tester inserted into the middle comes out clean (Be very careful of overbaking!  Check often, and early.)

Let cakes cool in the pans for 10 minutes before inverting onto wire racks to cool completely.  Frost cooled cakes as desired (You can find Joy the Baker's recipe by searching for The Best Chocolate Buttercream Frosting on her blog.  Or just google it!  It'll come up.)  Cake will last, well wrapped, in the refrigerator for up to 4 days.

Sources: adapted from Joy the Baker's Cookbook


10.20.2012

Cream Cheese-Filled Pumpkin Snickerdoodles, A Guest Post, and a Giveaway!


  Some title, eh?  'Tis only natural, because this is a pretty big deal!  

  Those of you who follow my postings on facebook know that I'm participating in Bakeaholic Mama's Pumpkin Week!  Her blog has seriously been exploding with the stuff since Sunday, and my humble little cookies are polishing it all off today. 


  And that's not all, Le Creuset is giving away some lucky reader this gosh-darned-adorable pumpkin casserole dish!  Seriously!


  So yeah, pretty pumped!  Head over there now to read my post of pumpkin goodness, check out the other awesome pumpkin-y posts, and enter to win a one-of-a-kind dish!

(Disclaimer: I received no monetary compensation for writing this post, all opinions are my own.  Le Creuset, through Bakeaholic Mama, is providing one winner with a pumpkin casserole dish.)


10.14.2012

Caramel Pumpkin Black and White Cookies


  I've got the crunch of leaves stuck in my head.  And if there was some way to combine the aromas of cinnamon and damp earth into a cookie without being totally gross...I'd do it.

  Dear autumn, I'm stuck on you.


  What I'm not stuck on are colds and coughs that keep you up half the night and induce tears at work.  Mhm, not so lovely.

  When one's sinuses are boycotting oneself...setting up a fussy photoshoot is not an enjoyable task.  I was going for simple here.  Simple, rustic cookies.  Simple, half-assed glaze jobs.  Simple, pretty baskets.  And simply amazing cookies.


  I do love autumn, but honestly, I'm not a huge pumpkin girl.  I never really have been.  However, Sundays with Joy has already broadened my horizons in many respects, so obviously it's going to get me to bake with pumpkin.  Even with a horrendous head cold.

  Dedication, y'all.  I'm into this group.  And guess what?  I LOVE these cookies.  Worth it all. 

  Unless you live under a rock, you've probably heard of the phenomenon that is black and white cookies.  Honestly, I've never actually had one.  I guess they're pretty big in NYC, but I've never been (Ironic, considering the fact that I'm wearing a Big Apple sweatshirt.  Thanks to Goodwill for making me look like I actually travel.  $4 sweatshirt.  No judging, and I totally washed it.).


  But anyway, you definitely don't need to go all the way to NYC to get a cookie.  At least, not when you can make your own soft, pumpkin-spiced-chocolate-caramel-glazed ones at home.  Right, am I right?

  I am, and you know it.  Go, bake, live.

  And don't get sick.


Caramel Pumpkin Black and White Cookies
Yield: about 32 cookies

Ingredients for the cookies:
  • 2 cups flour
  • 1 1/2 teaspoons baking powder
  • 1 teaspoon baking soda
  • 1/2 teaspoon salt
  • 1 teaspoon cinnamon
  • 1/4 teaspoon ginger
  • 1/8 teaspoon freshly-ground nutmeg
  • 2 large eggs
  • 1 cup sugar
  • 1/2 cup vegetable oil
  • 1 (15 oz.) can pumpkin puree
  • 1 teaspoon vanilla extract
  • Scant 1 cup chopped walnuts

Ingredients for the chocolate glaze:
  • 4 ounces semisweet chocolate chips
  • 3 tablespoons unsalted butter
  • Pinch of salt
  • 1 tablespoon light corn syrup

Ingredients for the caramel glaze:
  • 4 tablespoons unsalted butter
  • 1/2 cup packed light brown sugar
  • 2 tablespoons milk or half-and-half
  • pinch of sea salt
  • 1/4 teaspoon vanilla extract
  • 1/2 to 3/4 cup powdered sugar

Directions:
Preheat oven to 325 degrees F and line a few baking sheets with parchment paper.

To make the cookies, whisk together the flour, baking powder, baking soda, salt, cinnamon, ginger, and nutmeg together in a medium bowl.  In a large bowl, whisk together the eggs and sugar until well incorporated and slightly pale, about 2 minutes.  Add the oil, pumpkin, and vanilla and whisk carefully until well blended.  Add the flour mixture to the pumpkin mixture all at once and fold together with a spatula.  When there are just a few dry bits remaining, add the walnuts and fold together completely.

Dollop tablespoonfuls of batter onto the baking sheet, keeping about 2 inches apart.  With a butter knife or the back of a spoon, spread the batter slightly to create a 2-inch circle (the neater you do this, the more uniform your cookies will come out- I sorta went for the more rustic look myself).  Bake the cookies for 12-14 minutes, until just cooked through- a toothpick inserted into the center of a cookie should come out clean.  Allow to cool on the pan for 10 minutes before transferring to a wire cooling rack to cool completely.  While the cookies cool, make your glazes.

To make the chocolate glaze, place a small heatproof bowl over, but not touching, simmering (not boiling) water.  Add the chocolate and butter to the bowl.  Stir until melted then remove the bowl from the heat.  Stir in the salt and corn syrup and set aside.

To make the caramel glaze, in small saucepan, melt the butter.  Stir in the brown sugar and milk. Cook over medium-low heat for 1 minute. Transfer to a mixing bowl and mix on medium speed to cool the mixture slightly. Add in the salt, vanilla, and 1/2 cup powdered sugar on low speed. Beat with an electric mixer until well blended. If necessary, add more milk or powdered sugar to get the right consistency (I added about 3/4 cup total of powdered sugar, but next time I'd go with a little less to get a glossier finish).  Set aside. 

When the cookies are completely cool, place the parchment paper from your baking sheets under the cooling racks and flip each cookie over, brushing off any crumbs (this way, the flat bottom of the cookie will become the top).  With a butter knife, spread the caramel glaze on one half of a cookie.  With a separate butter knife, spread the other side of a cookie with the chocolate glaze.  Set the cookie back on the rack, frosted side up, to harden before wrapping.

Cookies are best stored wrapped individually in plastic wrap and put in an airtight container.  Keep at room temperature for up to 4 days.

Sources: adapted from Joy the Baker's Cookbook, caramel icing from these scones


10.03.2012

Caramel Apple Scones


  Presidents are debating, I'm shoving a goodly amount of working hours into a week, my birthday is a little over a month away, and I really need to get my senior pictures together.

  But right now, work seems to trump everything.  Must be a thing with seasonal jobs.  I get up, do school, go to work.  I come home, eat some food, and talk about work.  I go to bed, try to fall asleep, and think about work.

  I'm definitley driving my family crazy.  I'm driving me crazy.  But what can I say?  I love my job.


  Caramel apples are a big part of work.  And, obviously, so are scones.

  So when I saw this on The Baker Chick's site, and had a couple hours to kill, obviously they had to be made.

  I mean, when you work in a bakery where you dip apples two dozen at a time and spend the whole day on your feet in the face of hot ovens and loud freezers, obviously when you get some time off, you bake some more.

  Judge away.


  A few notes, recipe-wise.  This scone dough was one of the driest I've encountered, and I've worked with a few a different recipes!  And by dry, I mean that getting it to come together after adding the sour cream was tough.  The finished products, however, were absolutely to die for- so moist!

  What I'm saying is, don't get your knickers in a knot because you have some majorly shaggy dough that you desperately want to add a little buttermilk to.  It's normal, so resist.  It'll come together with a little kneading, and all will be well.  If you're afraid that, in your frantic kneading, you've overworked the dough, just mush into some sort of shape and chill in the freezer for five minutes.  Let it rest!


  Any problems the dough might give you is definitely made up for by the glaze.  Sooo flippin' phenomenal!  And, no, it doesn't involve melting down and caramelizing sugar, an act that seems to scare the pants off most people.  It starts out as more of a caramel that you'd use for caramel corn...except with milk.

  I'm definitely not making sense now.  Just rest assured that it's easier than you think, and the flavor is to die for.  It's unconventional in the best way possible.

  And also, scones shouldn't have to last more than a day, because otherwise they just lose their luster.  Whether this means that you'll have to take them to work (shocker), make a half batch, freeze some unglazed ones, pawn them off on neighbors, or just eat several in one sitting...do it.

  Make everyone else's dish at your fancy brunch look like crap.  Happy fall!


Caramel Apple Scones
Yield: 12 large or 24 mini scones

Ingredients for the apples:
  • 1 tablespoon butter
  • 2 large apples, peeled and chopped (Granny Smith, Gala, and Honey Crisp all work well)
  • 1 teaspoon cinnamon
  • Pinch of freshly-grated nutmeg
  • 1/2 teaspoon vanilla extract

Ingredients for the scones:
  • 3 cups flour
  • 1/3 cup sugar
  • 2 tablespoons baking powder
  • 1 teaspoon baking soda
  • 1/2 teaspoon salt
  • 1 teaspoon cinnamon
  • Pinch of freshly-grated nutmeg
  • 1/2 cup (1 stick) unsalted butter, cold and cut into small pieces
  • 1 cup sour cream (or plain greek yogurt)

Ingredients for the glaze:
  • 4 tablespoons unsalted butter
  • 1/2 cup packed light brown sugar
  • 2 tablespoons milk or half-and-half
  • pinch of sea salt
  • 1/4 teaspoon vanilla extract
  • 1/2 to 3/4 cup powdered sugar 

Directions:
Preheat the oven to 350 degrees F.   Line a couple baking sheets with parchment paper.

To prepare the apples, melt the butter in a small saucepan over medium heat. Add the apples, cinnamon, and nutmeg and stir for 4-5 minutes while they cook and soften (you want them slightly softened, but still a bit firm to hold up in the oven).  Remove from heat and stir in the vanilla.  Transfer the apples to a bowl and place in the freezer to cool while you prep the scone dough.

In a large bowl, whisk together the flour, sugar, baking powder, baking soda, salt, cinnamon, and nutmeg.  Add the cold butter and rub together with your hands until a coarse meal forms and the biggest butter bits are no larger than peas.  Check to see if the apples are completley cool.  If not, place the butter/flour mixture in the fridge while you wait for the apples to cool.  When ready, stir in the sour cream and apples until the dough comes together (Don't overwork it and melt the butter, and if necessary use your hands to knead it all together in the bowl- it's a dry dough).

Turn the dough out onto a lightly floured surfaceIf making large scones, pat and press into a 14x4 inch rectangular log.  If making mini scones, form into a 12x6 inch rectangular log.  For large scones, just cut the 14x4 rectangle on the diagonal into 12 triangles.  For mini scones, cut the 12x6 rectangle in half lengthwise, then cut each half into 12 triangles as well, giving you 24 mini scones.  Place the finished scones on the prepared baking sheets, leaving about 1/2 inch between each one, and place in the freezer to chill for five minutes.

Bake for 15 to 18 minutes, or until they are firm on top and lightly-browned. Let them cool for a few minutes, and then transfer to a cooling rack. 

To make the icing, in small saucepan, melt the butter.  Stir in the brown sugar and milk. Cook over medium-low heat for 1 minute. Transfer to a mixing bowl and mix on medium speed to cool the mixture slightly. Add in the salt, vanilla, and 1/2 cup powdered sugar on low speed. Beat with an electric mixer until well blended. If necessary, add more milk or powdered sugar to get the right consistency.  Drizzle icing over warm scones.  Serve immediately, or keep in an airtight container for up to 24 hours.


Sources: adapted from The Baker Chick, who was inspired by Recipe Girl