Terms, Contact Info, Recipe Index, and link love

2.23.2013

Brown Butter Marshmallow Popcorn Bars


  We used to host annual Oscars parties, back when we had consistent company/friends that cared about such things.  I remember one occasion when my little sister and I decided to get all "dressed up" for the red carpet.  This consisted of a horrendous amount of cherry-red (and scented) lip gloss, sparkly blue dresses a couple sizes too big, and plastic heels.  The ladies who came lent us their feather-y boas.  We were a couple of very happy and doted upon girls.


  Then one year, sister Carol invited a heck of a lot of people.  I don't remember much of it, besides the fact that you could hardly see or hear the TV, the living room was so stuffed.  While it was fun, I do believe that put an end to our little get-togethers.

  That kind of saddens me, I have pretty good memories from those parties.  Mom would print out ballots, and everyone would make their best guesses as to who would win.  There were friendly bets and prizes, and it was just nice.


  Although, being more of a little girl during those times, I didn't really give a hoot about who won the naked gold dude.  But any excuse for mom to make a spread of junk food was alright with me.  The Oscars have always been our Superbowl, in that sense.

  I remember when I first started contributing—it was around the time that I got my first cookbook, actually.  I was pretty proud of my candy sushi and deviled eggs (there's a contrast).


  For this week's Sundays with Joy recipe, we had a rice krispy treat on the menu.  I was getting all ready to whip them together when I realized something.  We had no rice krispies.  Ha.

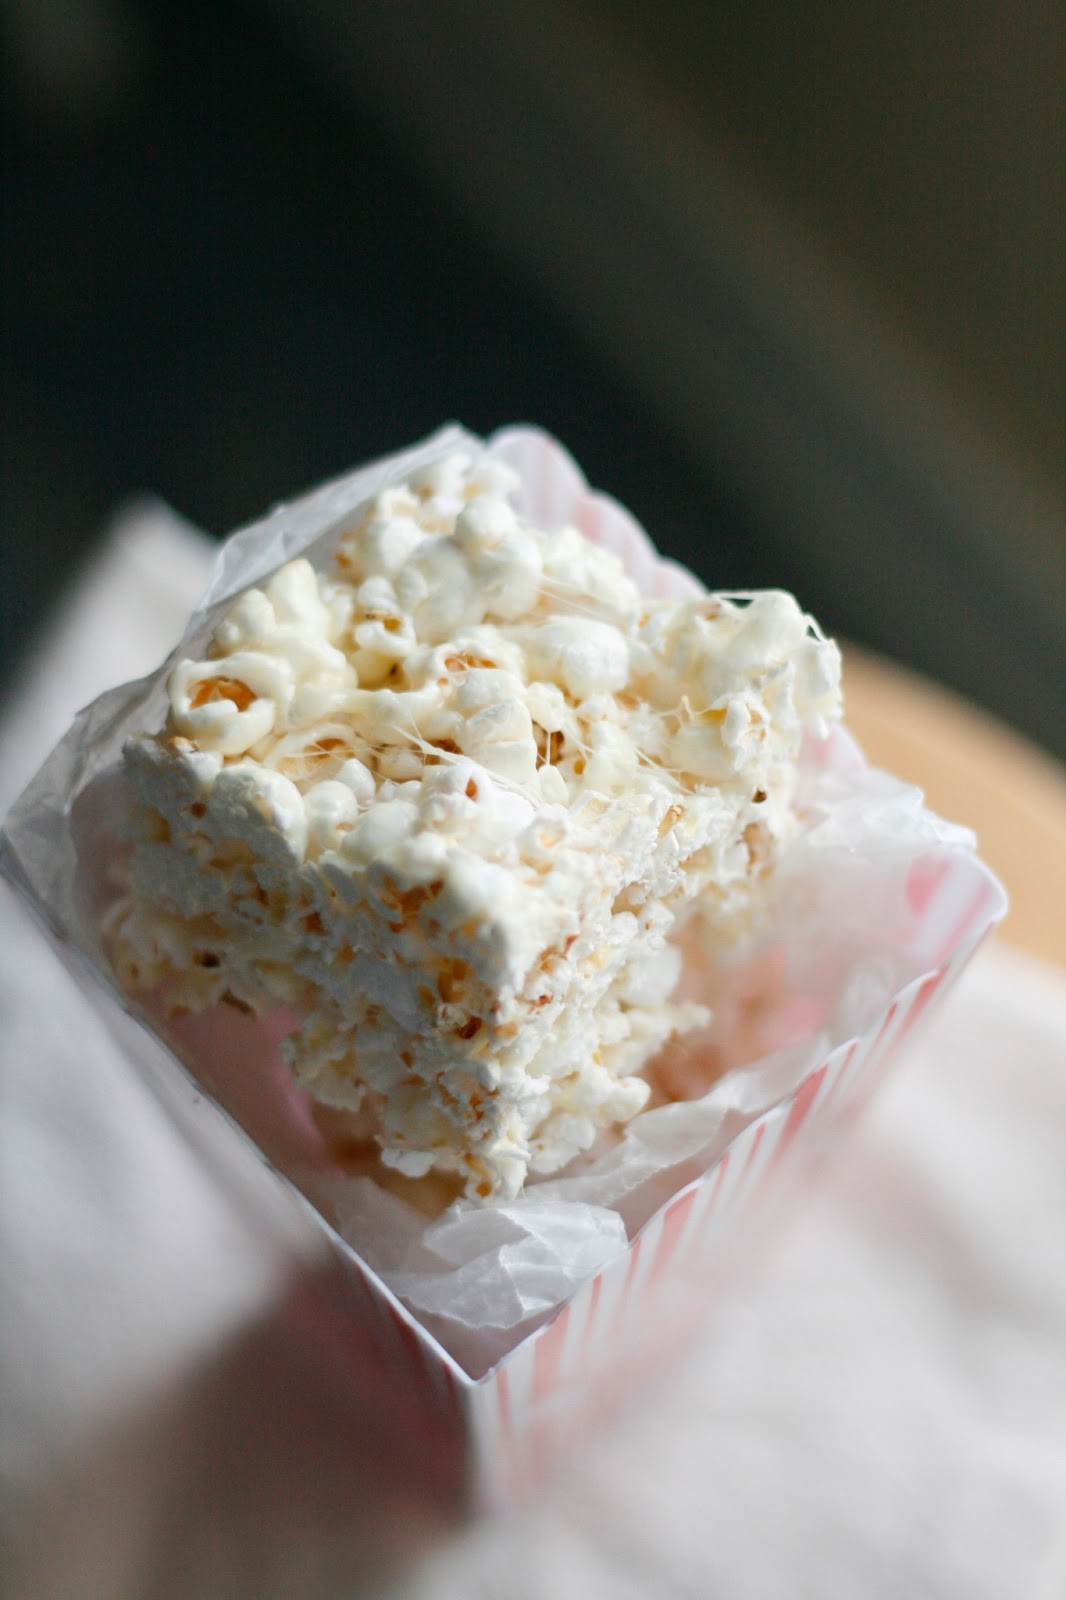
  But then, I remembered seeing these earlier in the week.  Now, there is always popcorn to be had in this house.  Always.  And seeing as it's the weekend of the Oscars, what could be more appropriate?  The result was flippin aweosme, sweet and salty at its best.


A few tips:

  If you can, try to pick out any un-popped kernels, and so spare everyone's teeth.

  Apparently, you can brown butter in the microwave.  I've never done this, and I don't know that I'd recommend it, but it works for Audra!  But otherwise, just follow the directions below for the stovetop.

  Not so much a tip as me just trying to sell these to you, but they're super quick!  If you find yourself with a late invitation or unexpected company, hit these up, no matter the occasion.  I mean, they're rice krispie treats, with popcorn.  Pretty awesome.

  These are best eaten fresh.  Like, as soon as they set up fresh.  I've become prone to popping one in the microwave for 15 seconds, letting it become warm and gooey all over again.  Then I pull it apart, piece by sticky piece.  Because these are meant to be savored.


Brown Butter Marshmallow Popcorn Bars
Yield: 9 large bars

Ingredients:
  • 3 tablespoons vegetable oil (if popping the corn on the stovetop)
  • 1/3 cup un-popped popcorn kernels
  • sea salt to taste
  • 2 tablespoons unsalted butter
  • 3 cups mini marshmallows, or 30 large marshmallows
  • A dash of vanilla extract

Directions:

Grease an 8x8 inch pan and set aside.  Pop the 1/3 cup popcorn kernels according to your preferred method.  Below is a stovetop method, for those without popcorn poppers.  

Add the oil to a large saucepan (that has a matching, well-fitting cover) over medium high heat and add 3-4 kernels of un-popped corn, cover the pot.  As soon as you hear those kernels pop, remove the saucepan from the heat, uncover, and add the rest of the kernels.  Count to 30, and then cover the saucepan and return to heat.  While holding on the cover securely, gently shake the pot back and forth on the heat until the popping sound has died down. (It won't take long.) Leave the cover slightly ajar to let the steam out—this will result in crispier popcorn.  Add the popcorn to a large bowl, sprinkle with a few pinches of sea salt to taste, and then set aside. (If you have the time, try to pick out any un-popped kernels, for the sake of everyone's teeth.)

In a medium saucepan, melt the butter over medium heat.  Butter will melt, foam, and froth and then begin to brown along the bottom.  Just as it begins to brown, add the marshmallows and splash of vanilla (this will be loud).  Stir immediately with a rubber spatula, to keep anything from burning.  Continue stirring until the mixture is thick and creamy and has no lumps of marshmallow.  

Immediately pour it over the popcorn and stir well to coat.  Press the mixture into the greased 8x8 inch pan and sprinkle with more sea salt to taste.  Let it set for about 10-15 minutes, then cut into bars and serve.

Sources: adapted from The Baker Chick and Joy the Baker's Cookbook


2.17.2013

S'mores Cheesecake Bars


  It's a flannel sort of Sunday.  I've been sleeping in like nobody's business this weekend, and wearing crazy Target knee socks.  There are gummy bears galore, pianos to be played, and I'm currently wrestling through Wuthering Heights.  Speaking of which, can somebody please explain to me the extreme appeal girls seem to have towards Heathcliff?  I mean, sure, he's got a danged pathetic story, but the only person he really seems to care for is Catherine- and even then, he's got a pretty funny way of expressing his devotion.  I won't even get into Catherine's character right now.  Nope.  Can't.  Won't.


  I guess ladies are just funny like that.  They want the drama, the heartbreak, all that jazz.  Mr. Bennet of Pride and Prejudice puts it quite well: "Next to being married, a girl likes to be crossed in love a little now and then. It is something to think of, and gives her a sort of distinction among her companions."

  Jane Austen can certainly tell it like it is.


  Chocolate seems to be the healer of many things, especially broken hearts.  But you know what?  Give me marshmallows anytime.  This is why s'mores are such a perfect balance for me.  That is, as long as the marshmallow to chocolate ratio is just right.

  S'mores are a happy medium for many people, and cheesecake the weakness of many more.  Enter these guys.


  Now I'll be honest here, I'm not a super duper huge cheesecake fan.  But my tastebuds are ever expanding their horizons, and I often find certain food items I used to despise growing on me.  These cheesecake bars are one example of that.  Marshmallows, chocolate, and cheesecake are a match made in heaven.


  So say hello to my new go-to for "Can you bring dessert?" when we're invited to dinner.  People love it, I love it, we all love it.

  However, you certainly don't need the excuse of a dinner party to make these.  Get a little affair of the heart going, and suddenly you'll have every justifiable excuse.  Perks of being a girl, aye?


S'mores Cheescake Bars
Yield: about 12-16 bars

Ingredients for the crust:
  • 1 cup graham cracker crumbs
  • 1 tbsp. sugar
  • 4 tbsp. unsalted butter, melted

Ingredients for the cheesecake:
  • 4 oz. bittersweet or semisweet chocolate, finely chopped
  • 8 oz. cream cheese, at room temperature
  • ¼ cup sour cream
  • ½ cup marshmallow cream
  • 2 tsp. cocoa powder
  • ¾ tsp. vanilla extract
  • 2 large eggs 

Ingredients for the topping:
  • 1½ cups mini marshmallows 
  • Milk chocolate chips, melted (optional)

Directions:
To make the crust, preheat the oven to 350˚ F.  Line an 8×8-inch baking pan with foil (Do not use parchment, since you will be later torching/broiling the marshmallows.  Fire hazard!); spray lightly with cooking spray.  Combine the graham cracker crumbs, sugar, and melted butter in a small bowl.  Stir together with a fork until well combined.  Press the mixture in an even layer into the bottom of the prepared baking pan (A large, flat-bottomed glass helps to make an even layer.).  Bake 10-12 minutes, or until golden brown; transfer to a wire rack while you prepare the filling.  Reduce the oven temperature to 325˚ F.

To make the filling, place the chopped chocolate in a heatproof bowl set over a pot of simmering water, making sure the bowl isn't touching the water.  Heat until melted and smooth, stirring occasionally, making sure the water never boils.  Remove from the heat and let cool slightly.  In the bowl of a stand mixer fitted with the paddle attachment, combine the cream cheese, sour cream, and marshmallow cream.  Beat on medium-high speed until smooth and well combined, 1-2 minutes.  Blend in the cocoa powder, vanilla extract, and eggs until incorporated.  Stir in the melted chocolate until well blended.  Pour the filling over the graham cracker crust and smooth the top with a spatula.  

Bake for about 30 minutes, or until the center is just set (only jiggles the slightest bit in the center when gently shaken.).  Remove from the oven.

Evenly top the cheesecake layer with the mini marshmallows.  Return to the oven for 2-3 minutes, just long enough so the marshmallows begin to melt into each other (If using a broiler to toast the marshmallows, really make sure you don't let them melt into each other too much in this step.  You want them to keep some of their uniformity so they can withstand the broiler.).  Transfer to a wire cooling rack.  Using a kitchen torch, lightly brown the tops of the marshmallows.  (Alternatively, this can be done underneath the broiler with a very watchful eye.) Once the cheesecake has cooled to room temperature, drizzle with melted milk chocolate if desired.  Transfer to the refrigerator and chill 2-3 hours before slicing and serving.

Sources: heavily adapted from Annie's Eats, who adapted from Sugar Plum Blog


2.11.2013

Raspberry Cream Cheese Stuffed French Toast~ A Breakfast in Bed Series


  We're continuing on the Valentine's theme today!  Dessert is covered, so let's focus on breakfast now.  Or, more specifically, breakfast in bed.


  I've shared this recipe with the well known recipe site, Cucumbertown, "a closely knit tribe curating recipes from the world over."  They're currently doing a breakfast in bed series, and kindly asked me to contribute a little something.

  After much emailing and recipe choosing, I settled on this decadent french toast.  And it's probably the best choice I've ever made.


  You can easily join up with Cucumbertown via facebook.  You'll make lots of friends, and have access to some pretty awesome recipes, while being able to share some of your own!  Here's my profile, if you decide to join up and find you'd like a friend to follow :) But you don't need to join to view this recipe, you can still get it!  And trust me, you want it.

  To get the recipe and see my post, click here!  

  Happy french toast-ing!


Sources: French Toast adapted from Annie's Eats

2.10.2013

Mini Red Velvet and Chocolate Layer Cake


  And here we go!  Let singles awareness week commence.

  Now, obviously I'm not totally against Valentine's.  But still, 99% of the reason I made this little beauty is because it's for Sundays with Joy.  I'll still take any excuse to buy chocolate and watch chick flicks, though!  Valentine's is special for me in some ways.  I wrote up last year about how we celebrate it in our family, and those homemade cards and little gifts are what make it lovely.


  Now, Joy's original recipe was actually a Red Velvet Marble cake.  I scanned through it, and started thinking about my favorite red velvet recipe, and then of my chocolate cake that required no stand mixer.  That would definitely make things easier, since I wouldn't have to wash my mixer bowl between cake batters.  And, well, since those cake batters might not marble well together, maybe I'll just do layers.

  This thinking progressed to "What in the heck am I going to do with a 8-inch double layer sitting around the house?"  I decided a bit of downsizing was in order.  I've already posted about cupcakes, so that was out.


  After rifling through my ever-growing pan collection, I found the little 5 by 1 1/2 inch that used to be my grandma's.

  From there on, it was all recipe math and the tedious baking of little cake layers with my one pan.  Which is why I recommend in the recipe that you have at least two!  One is feasible, but it's not a lot of fun.


  After much baking, frosting, chilling, and sprinkling, I had the most precious little cake.  And I would not wish this any bigger, because it's pretty rich!  One piece of this guy is just right.  I also recommend doing this over two days.  It's not hard, just kind of time-consuming.  And cake layers are always easier to stack when they've been chilled.

  Make it for somebody special, your roommate, your mother, or just you!  Everyone deserves cake.


Mini Red Velvet and Chocolate Layer Cake
Yield: one 4-layer, 5- or 4-inch cake

Ingredients for the chocolate cake:
  • ½ stick (¼ cup, 4 tbsp.) unsalted butter, cut into 4 pieces
  • 1 ounce bittersweet chocolate, chopped
  • ¼ cup Dutch-process cocoa
  • ¼ cup + 2 tbsp. all-purpose flour
  • ¼ teaspoon baking soda
  • ¼ teaspoon + ⅛ teaspoon (or ⅜ teaspoon) baking powder
  • 1 large egg
  • ¼ cup + 2 tablespoons granulated sugar
  • ½ teaspoon vanilla extract
  • ¼ teaspoon salt
  • ¼ cup sour cream (or 3 tablespoons buttermilk)

Ingredients for the red velvet cake:
  • ½ cup + 2 tablespoons cake flour
  • ¼ cup + 2 tablespoons sugar
  • ¼ teaspoon baking soda
  • ¾ teaspoon cocoa powder
  • ¼ teaspoon salt
  • ½ large egg*
  • ¼ cup + 2 tablespoons vegetable oil
  • ¼ cup buttermilk
  • ½ tablespoon liquid red food coloring
  • ¼ teaspoon vanilla extract
  • ¼ teaspoon distilled white vinegar

Ingredients for the cream cheese frosting:
  • 8 ounces cream cheese, chilled
  • 5 tablespoons unsalted butter, at room temperature
  • 2 teaspoons imitation (clear) vanilla extract
  • 2½ cups powdered sugar
*To halve an egg, crack into a bowl or measuring cup, lightly beat together, then simply measure out half.


Directions:
Place oven racks in the center and upper third of the oven and preheat to 350 degrees F.  Grease two 5- or 4-inch pans.  Line bottoms with parchment and grease, then flour the parchment and pan.  Set aside.

For the chocolate cake, in a double boiler or a heat-proof bowl set over barely simmering water (not touching the water), combine the butter, chocolate, and cocoa. Heat until the butter and chocolate are melted and whisk until smooth (Do not allow the water to boil.). Set aside to cool until just warm to the touch.

In a small bowl, whisk together the flour, baking soda and baking powder.  In a medium bowl, whisk the egg just to combine - then add the sugar, vanilla, and salt and whisk until smooth and fully incorporated. Add cooled chocolate mixture and whisk until combined.  Add the flour and sour cream in three additions, beginning and ending with the flour. Whisk only until each addition disappears into the batter. Don't overmix, but make sure the dry and wet ingredients are fully combined before proceeding.  

Divide the batter evenly between the two prepared pans. Bake, rotating halfway through baking, for about 18-20 minutes, or until a tester inserted into the middle of the cake comes out clean.  Let cool in the pans for 5 minutes, run a butterknife around the edges, then turn out onto a wire rack to cool completely.  

To make the red velvet cake, maintain the oven temperature at 350 degrees F. Grease, line with parchment, and flour two more 5- or 4-inch pans.

In a small bowl, combine the cake flour, sugar, baking soda, cocoa powder and salt; whisk to blend.  In the bowl of an electric mixer, combine the eggs, vegetable oil, buttermilk, food coloring, vanilla, and vinegar.  Beat on medium speed until well blended.  Mix in the dry ingredients on low speed and beat until smooth, about 2 minutes.

Divide batter evenly between prepared pans.  Bake, rotating the halfway through baking, until a toothpick inserted in the center comes out clean, about 18 minutes.  Let cool in the pans for 5 minutes, run a butterknife around the edges, then turn out onto a wire rack to cool completely. The red velvet tends to dome, so you may have to level your cakes with a serrated knife or cake leveler.

Cooled cakes can be wrapped well and stored in the fridge overnight.

To make the frosting, combine the cream cheese and butter in the bowl of an electric mixer. Beat on medium-high speed until well combined and smooth, about 2-3 minutes. Mix in the vanilla extract. Gradually beat in the powdered sugar on low speed until totally incorporated, then increase the speed and beat until smooth.

Assemble your cake as desired, with a level amount of frosting between layers. Spread a very thin coat of frosting over the assembled cake to trap any crumbs the sticky frosting will pull out, this is called a crumb coat. Chill the crumb coat in the freezer for 30 minutes, keeping your bowl of frosting in the fridge while the cake chills. Remove cake from freezer and frost to cover up the hardened crumb coat. Decorate as desired and let cake rest in the fridge for 10 minutes before cutting and serving.

Sources: inspired by Joy the Baker's Cookbook, red velvet adapted from Annie's Eats, chocolate cake adapted from Confessions of a Tart, frosting adapted from Annie's Eats